kubeadm部署kubernetes高可用集群-VIP版
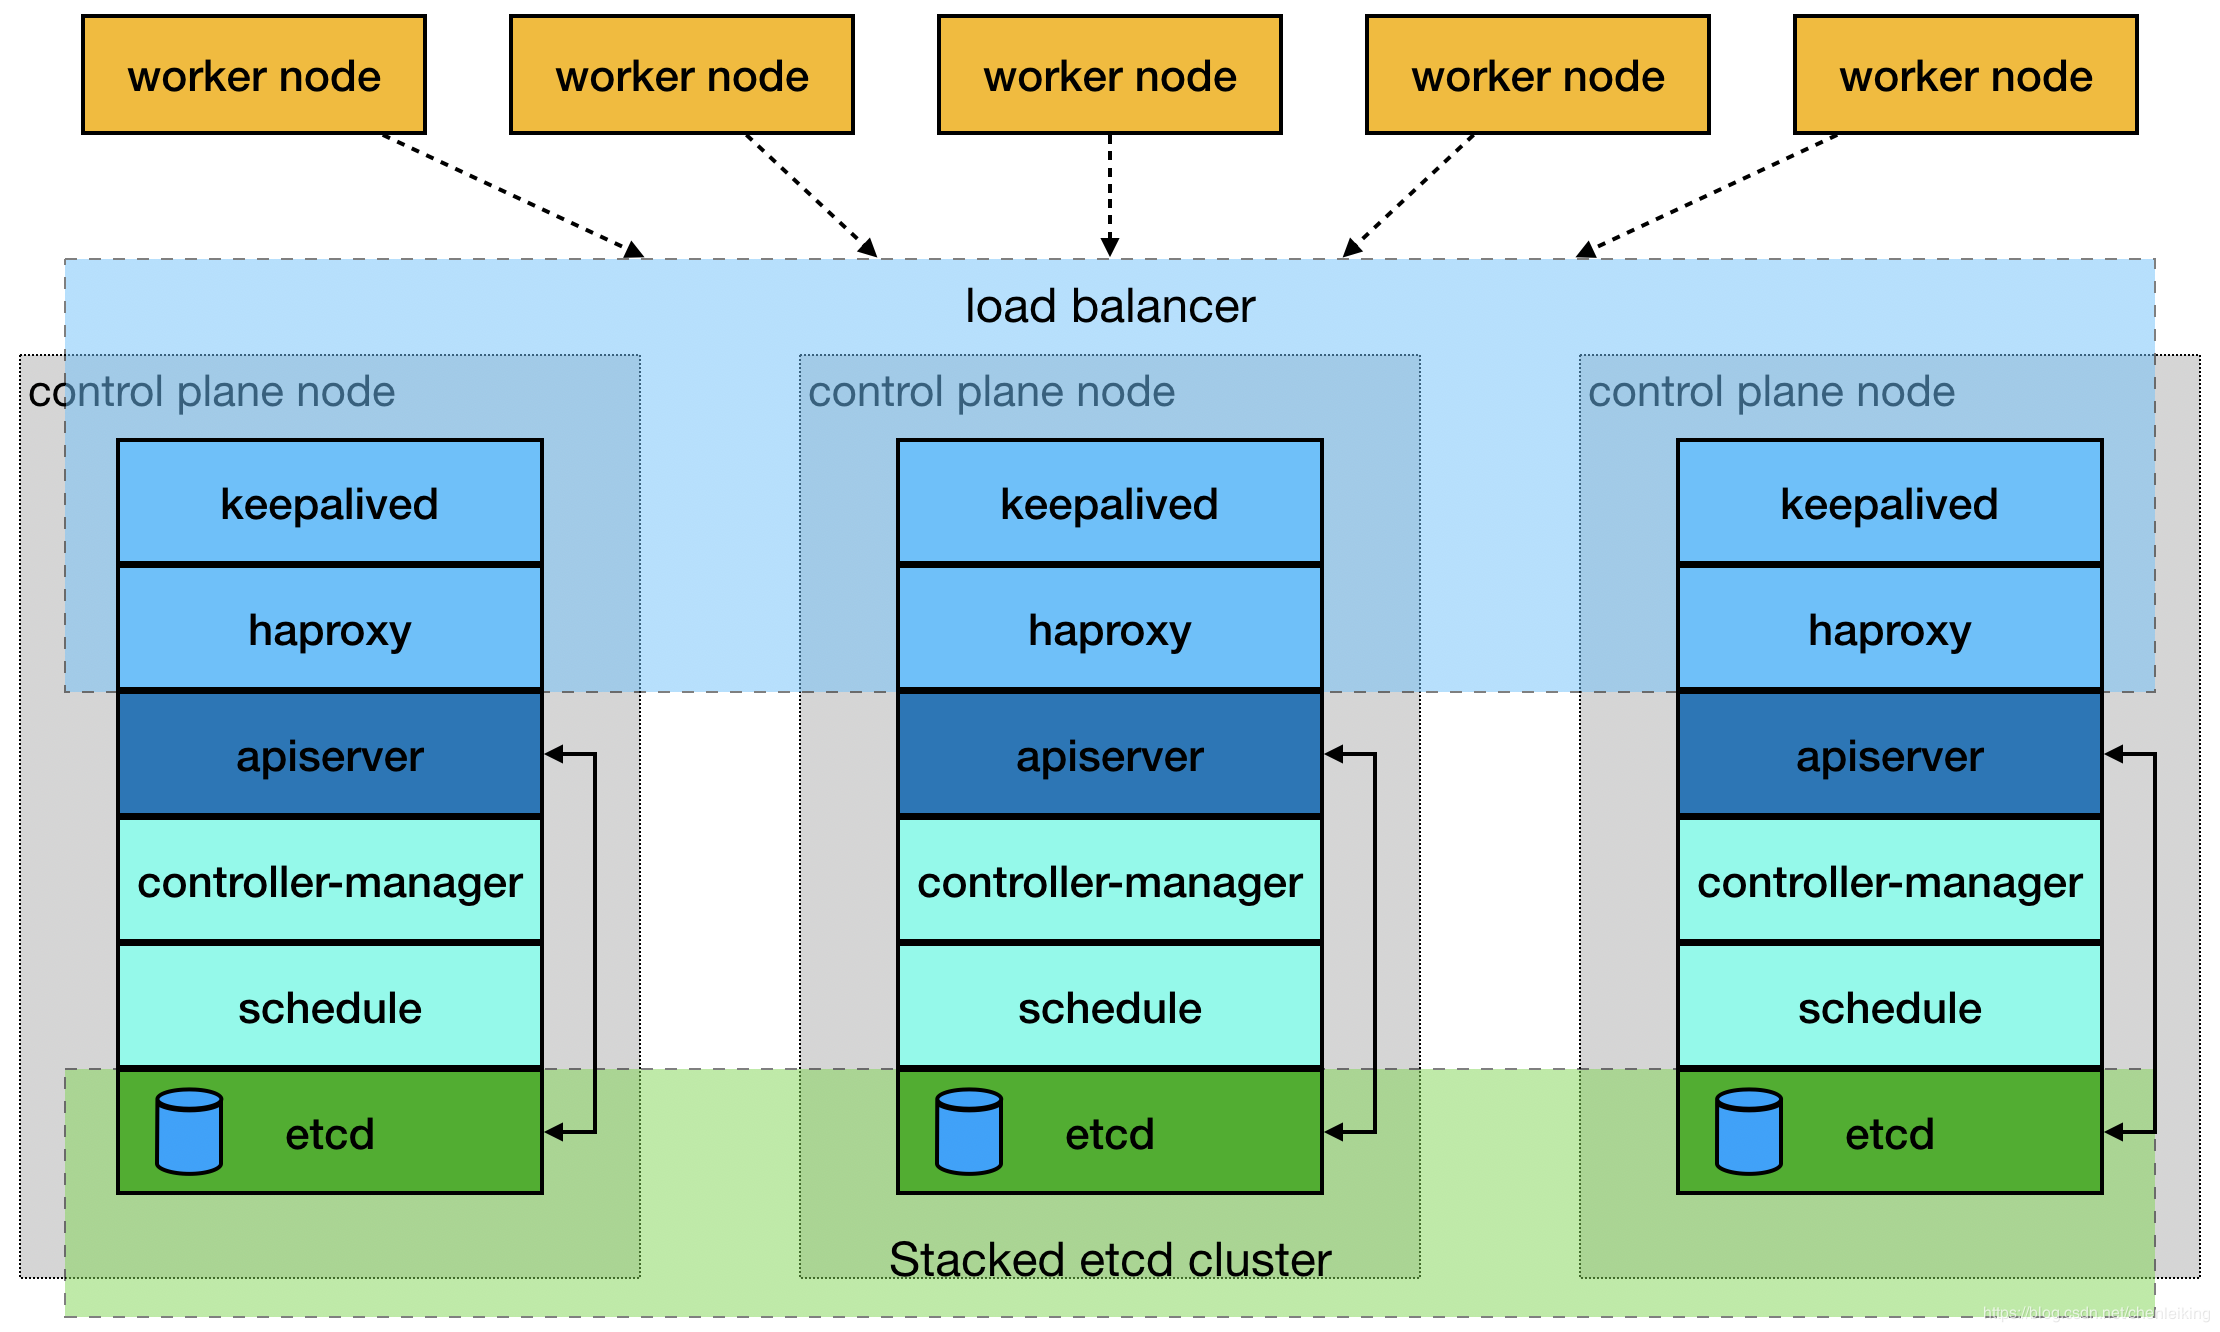
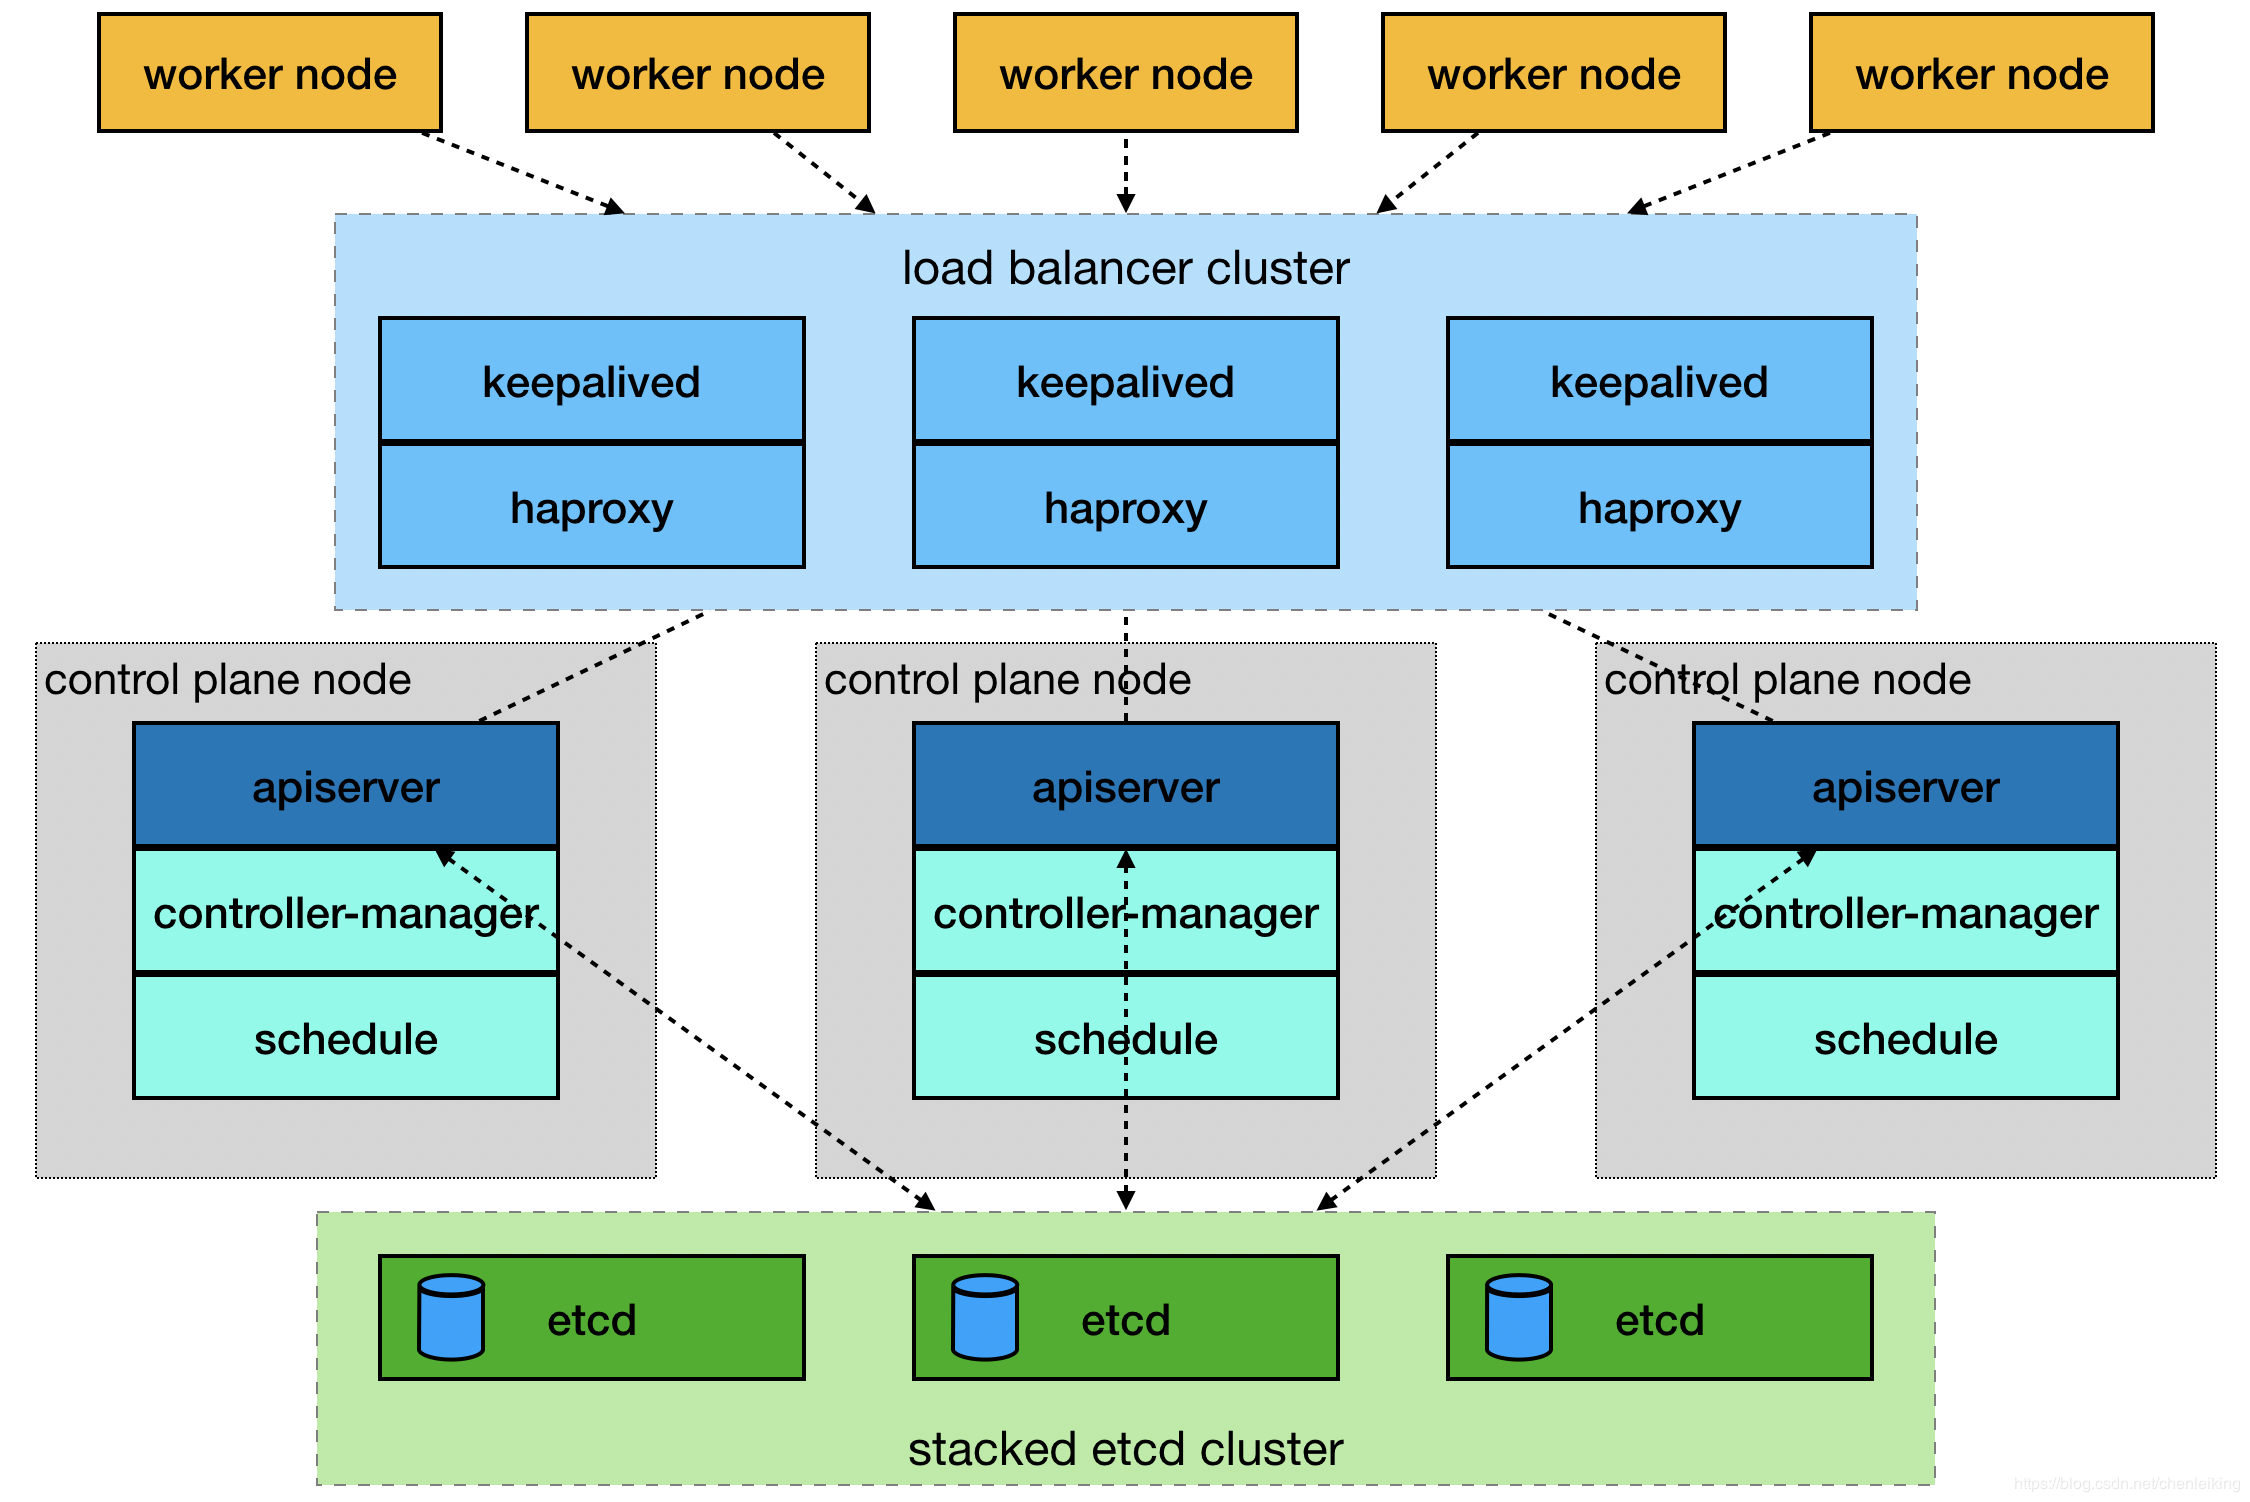
官网 提供了两种拓扑结构部署集群:stacked control plane nodes 和external etcd cluster ,本文基于第一种拓扑结构进行部署,使用Keepalived + HAProxy 搭建高可用Load balancer 。
stacked control plane nodes 架构图
external etcd cluster 架构图
一.环境准备
主机名
IP地址
说明
组件
master01
192.168.3.11
master节点
kubeadm、kubelet、kubectl、docker、haproxy、keepalived
master02
192.168.3.12
master节点
kubeadm、kubelet、kubectl、docker、haproxy、keepalived
master03
192.168.3.13
master节点
kubeadm、kubelet、kubectl、docker、haproxy、keepalived
node01
192.168.3.14
node节点
kubeadm、kubelet、docker、kube-proxy
node02
192.168.3.15
node节点
kubeadm、kubelet、docker、kube-proxy
node03
192.168.3.16
node节点
kubeadm、kubelet、docker、kube-proxy
无
192.168.3.10
keepalived虚拟IP
无
1.1.系统环境
Linux:Centos_7_5_64 (内核3.10+)
1.2.关闭防火墙
防火墙一定要提前关闭,否则在后续安装K8S集群的时候是个麻烦。执行下面语句关闭,并禁用开机启动:
1
systemctl stop firewalld & systemctl disable firewalld
1.3.关闭SeLinux
1
2
setenforce 0
sed -i 's/^SELINUX=enforcing$/SELINUX=disabled/' /etc/selinux/config
1.4.关闭Swap
在安装K8S集群时,Linux的Swap内存交换机制是一定要关闭的,否则会因为内存交换而影响性能以及稳定性。这里,我们可以提前进行设置:
执行swapoff -a 可临时关闭,但系统重启后恢复
编辑/etc/fstab ,注释掉包含swap 的那一行即可,重启后可永久关闭,命令如下:
1
sed -i '/ swap / s/^/#/' /etc/fstab
1.5.设置主机名
1
2
3
4
5
6
7
8
#主节点
hostnamectl --static set-hostname  master01
hostnamectl --static set-hostname  master02
hostnamectl --static set-hostname  master03
#从节点
hostnamectl --static set-hostname  node01
hostnamectl --static set-hostname  node02
hostnamectl --static set-hostname  node03
1.6.修改hosts
1
2
3
4
5
6
7
8
cat >> /etc/hosts << EOF
192.168.3.11 master01.kube.com
192.168.3.12 master02.kube.com
192.168.3.13 master03.kube.com
192.168.3.14 node01.kube.com
192.168.3.15 node02.kube.com
192.168.3.16 node03.kube.com
EOF
1.7.配置路由参数
CentOS_7可能会出现iptables被绕过而导致流量被错误路由的问题。确保 net.bridge.bridge-nf-call-iptables 在sysctl 配置中设置为1。
1
2
3
4
5
6
7
8
# 添加配置文件
cat << EOF > /etc/sysctl.d/k8s.conf
net.bridge.bridge-nf-call-ip6tables = 1
net.bridge.bridge-nf-call-iptables = 1
net.ipv4.ip_forward = 1
EOF
# 立即生效
sysctl -p /etc/sysctl.d/k8s.conf
二.开始安装
2.1.配置yum源
所有的节点都需要配置相同的yum源
使用阿里云镜像仓库 ,配置Docker和kubernetes的yum源。
1
2
3
4
5
6
7
8
9
10
11
12
13
14
15
cd /etc/yum.repos.d/

# 下载Docker
wget https://mirrors.aliyun.com/docker-ce/linux/centos/docker-ce.repo

# 配置kubernetes
cat << EOF > /etc/yum.repos.d/kubernetes.repo
[kubernetes]
name=Kubernetes
baseurl=http://mirrors.aliyun.com/kubernetes/yum/repos/kubernetes-el7-x86_64
enabled=1
gpgcheck=1
repo_gpgcheck=1
gpgkey=http://mirrors.aliyun.com/kubernetes/yum/doc/yum-key.gpg http://mirrors.aliyun.com/kubernetes/yum/doc/rpm-package-key.gpg
EOF
2.2.部署keepalived
部署在所有的master节点,keeplived的主要作用是为haproxy提供vip,在三个haproxy实例之间提供主备,降低当其中一个haproxy失效的时对服务的影响。vip地址指向master1、master2、master3。
1
yum install -y keepalived
配置,三台master节点配置稍微不同,根据备注修改
1
2
3
4
5
6
7
8
9
10
11
12
13
14
15
16
17
18
19
20
21
22
23
24
25
26
27
28
29
30
31
32
33
cat > /etc/keepalived/keepalived.conf << EOF
! Configuration File for keepalived

global_defs {
   router_id LVS_DEVEL
}

vrrp_script check_haproxy {
    script "killall -0 haproxy" # 根据进程名称检测进程是否存活
    interval 3
    weight -2
    fall 10
    rise 2
}

vrrp_instance VI_1 {
    state MASTER  			# 备分服务器上改为BACKUP
    interface ens33     # 改为自己的网络接口
    virtual_router_id 51
    priority 250        # 备分服务器上改为小于250的数字,如200,150
    advert_int 1
    authentication {
        auth_type PASS
        auth_pass 35f18af7190d51c9f7f78f37300a0cbd
    }
    virtual_ipaddress {
        192.168.3.10 # 虚拟ip,自己设定
    }
    track_script {
        check_haproxy
    }
}
EOF
1
2
3
4
5
6
# 启动
systemctl start keepalived.service && systemctl enable keepalived.service
# 查看状态
systemctl status keepalived.service
# 查看vip
ip address show ens33
2.3.部署haproxy
部署在所有的master节点,haproxy为apiserver提供反向代理,haproxy将所有请求轮询转发到每个master节点上。相对于仅仅使用keepalived主备模式仅单个master节点承载流量,这种方式更加合理、健壮。
1
2
3
4
5
6
cat >> /etc/sysctl.conf << EOF
net.ipv4.ip_nonlocal_bind = 1
EOF

# 立即生效
sysctl -p
1
2
3
4
5
6
7
8
9
10
11
12
13
14
15
16
17
18
19
20
21
22
23
24
25
26
27
28
29
30
31
32
33
34
35
36
37
38
39
40
41
42
43
44
45
46
47
48
49
50
51
52
53
54
55
56
57
58
59
60
61
62
63
64
65
66
67
68
69
70
71
72
73
74
75
76
77
78
79
80
81
cat > /etc/haproxy/haproxy.cfg << EOF
#---------------------------------------------------------------------
# Global settings
#---------------------------------------------------------------------
global
# to have these messages end up in /var/log/haproxy.log you will
# need to:
#
# 1) configure syslog to accept network log events. This is done
# by adding the '-r' option to the SYSLOGD_OPTIONS in
# /etc/sysconfig/syslog
#
# 2) configure local2 events to go to the /var/log/haproxy.log
# file. A line like the following can be added to
# /etc/sysconfig/syslog
#
# local2.* /var/log/haproxy.log
#
log 127.0.0.1 local2
chroot /var/lib/haproxy
pidfile /var/run/haproxy.pid
maxconn 4000
user haproxy
group haproxy
daemon
# turn on stats unix socket
stats socket /var/lib/haproxy/stats
#---------------------------------------------------------------------
# common defaults that all the 'listen' and 'backend' sections will
# use if not designated in their block
#---------------------------------------------------------------------
defaults
mode http
log global
option httplog
option dontlognull
option http-server-close
option forwardfor except 127.0.0.0/8
option redispatch
retries 3
timeout http-request 10s
timeout queue 1m
timeout connect 10s
timeout client 1m
timeout server 1m
timeout http-keep-alive 10s
timeout check 10s
maxconn 3000
#---------------------------------------------------------------------
# kubernetes apiserver frontend which proxys to the backends
#---------------------------------------------------------------------
frontend kubernetes
mode tcp
bind *:16443
option tcplog
default_backend kubernetes-apiserver
#---------------------------------------------------------------------
# round robin balancing between the various backends
#---------------------------------------------------------------------
backend kubernetes-apiserver
mode tcp
balance roundrobin
server master01 192.168.3.11:6443 check
server master02 192.168.3.12:6443 check
server master03 192.168.3.13:6443 check
#---------------------------------------------------------------------
# collection haproxy statistics message
#---------------------------------------------------------------------
listen stats
bind *:1080
stats auth admin:awesomePassword
stats refresh 5s
stats realm HAProxy \ Statistics
stats uri /admin?stats
EOF
1
2
3
4
5
6
# 启动
systemctl start haproxy.service && systemctl enable haproxy.service
# 查看状态
systemctl status haproxy.service
# 查看端口
ss -lnt | grep -E "16443|1080"
2.4.安装Docker
所有的节点都需要安装Docker
1
yum install -y docker-ce
1
systemctl start docker & systemctl enable docker
2.5.安装kubernetes
2.5.1.master节点安装
master节点需要安装kubeadm、kubectl、kubelet组件
1
yum install -y kubelet-1.13.0 kubeadm-1.13.0 kubectl-1.13.0 --disableexcludes = kubernetes
1
systemctl enable kubelet
确保kubelet 的cgroup drive 和docker的cgroup drive一样:
1
sed -i "s/cgroup-driver=systemd/cgroup-driver=cgroupfs/g" /usr/lib/systemd/system/kubelet.service.d/10-kubeadm.conf
2.5.2.初始化matser
选择一个master节点初始化,其余的master节点加入
1
2
3
cat >> /etc/hosts << EOF
192.168.3.10 cluster.kube.com
EOF
1
2
3
4
5
6
7
8
9
10
11
cat > /root/kubernetes/kubeadm-config.yaml << EOF
apiVersion: kubeadm.k8s.io/v1beta1
kind: ClusterConfiguration
kubernetesVersion: v1.13.0
apiServer:
  certSANs:
    - "cluster.kube.com"
controlPlaneEndpoint: "cluster.kube.com:16443"
networking:
  podSubnet: "10.244.0.0/16" # 根据选择的网络组件配置,本文使用flannel组件
EOF
1
kubeadm init --config = /root/kubernetes/kubeadm-config.yaml
1
2
3
4
5
6
7
8
9
10
11
12
13
14
15
16
Your Kubernetes master has initialized successfully !
To start using your cluster, you need to run the following as a regular user :
mkdir -p $HOME/.kube
sudo cp -i /etc/kubernetes/admin.conf $HOME/.kube/config
sudo chown $(id -u):$(id -g) $HOME/.kube/config
You should now deploy a pod network to the cluster.
Run "kubectl apply -f [podnetwork].yaml" with one of the options listed at :
https : //kubernetes.io/docs/concepts/cluster-administration/addons/
You can now join any number of machines by running the following on each node
as root :
kubeadm join cluster.kube.com : 16443 --token 5kad4d.1pa4jvjcba4tttsl --discovery-token-ca-cert-hash sha256:f1551456908535ed0c6078a199651a01ddf5cfb470a901f3e24701ea996f978e
要使kubectl为非root用户工作,请运行以下命令
1
2
3
4
5
6
mkdir -p $HOME /.kube
sudo cp -i /etc/kubernetes/admin.conf $HOME /.kube/config
sudo chown $( id -u ) :$( id -g ) $HOME /.kube/config
# 如果是root用户,则可以运行:
export KUBECONFIG = /etc/kubernetes/admin.conf
2.5.3.安装网络组件
网络组件有多种,常用的有calio和flannel ,只需要选择一种就可以了。
2.5.3.1.calio组件
1
2
3
4
# 下载
wget https://docs.projectcalico.org/v3.3/getting-started/kubernetes/installation/hosted/rbac-kdd.yaml

wget https://docs.projectcalico.org/v3.3/getting-started/kubernetes/installation/hosted/kubernetes-datastore/calico-networking/1.7/calico.yaml
修改配置,默认会使用主机的第一张网卡,如果有多张网卡,需要通过配置单独指定。
1
2
3
4
5
6
# Auto-detect the BGP IP address.
- name : IP
value : " autodetect"
# 添加如下的配置,设置使用的网卡
- name : IP_AUTODETECTION_METHOD
value : " interface=ens*"
1
2
kubectl apply -f rbac-kdd.yaml
kubectl apply -f calico.yaml
2.5.3.2.flannel 组件
1
2
# 下载
https://raw.githubusercontent.com/coreos/flannel/62e44c867a2846fefb68bd5f178daf4da3095ccb/Documentation/kube-flannel.yml
修改配置,flannel 默认会使用主机的第一张网卡,如果有多张网卡,需要通过配置单独指定。
1
2
3
4
5
6
7
8
9
containers :
- name : kube-flannel
image : quay.io/coreos/flannel:v0.11.0-amd64
command :
- /opt/bin/flanneld
args :
- --ip-masq
- --kube-subnet-mgr
- --iface=ens33 # 添加
1
kubectl apply -f kube-flannel.yml
1
kubectl get pods --all-namespaces
2.5.4.复制证书
复制证书到其他master节点,shell脚本如下
1
2
3
4
5
6
7
8
9
10
11
12
13
14
15
16
17
# 用户名
USER = root
# 服务器IP列表
CONTROL_PLANE_IPS = "192.168.3.12 192.168.3.13"
# 批量发送文件
for host in ${ CONTROL_PLANE_IPS } ; do
ssh " ${ USER } " @$host mkdir -p /etc/kubernetes/pki/etcd
scp /etc/kubernetes/pki/ca.crt " ${ USER } " @$host :/etc/kubernetes/pki/ca.crt
scp /etc/kubernetes/pki/ca.key " ${ USER } " @$host :/etc/kubernetes/pki/ca.key
scp /etc/kubernetes/pki/sa.key " ${ USER } " @$host :/etc/kubernetes/pki/sa.key
scp /etc/kubernetes/pki/sa.pub " ${ USER } " @$host :/etc/kubernetes/pki/sa.pub
scp /etc/kubernetes/pki/front-proxy-ca.crt " ${ USER } " @$host :/etc/kubernetes/pki/front-proxy-ca.crt
scp /etc/kubernetes/pki/front-proxy-ca.key " ${ USER } " @$host :/etc/kubernetes/pki/front-proxy-ca.key
scp /etc/kubernetes/pki/etcd/ca.crt " ${ USER } " @$host :/etc/kubernetes/pki/etcd/ca.crt
scp /etc/kubernetes/pki/etcd/ca.key " ${ USER } " @$host :/etc/kubernetes/pki/etcd/ca.key
scp /etc/kubernetes/admin.conf $host :/etc/kubernetes/admin.conf
done
2.5.5.部署其它master
在其余的master节点执行,加入集群命令,注意添加 -experimental-control-plane
1
kubeadm join cluster.kube.com:16443 --token 5kad4d.1pa4jvjcba4tttsl --discovery-token-ca-cert-hash sha256:f1551456908535ed0c6078a199651a01ddf5cfb470a901f3e24701ea996f978e --experimental-control-plane
1
2
3
4
5
6
7
8
9
10
11
# 节点状态
kubectl get nodes -o wide

# 组件状态
kubectl get cs

# 服务账户
kubectl get serviceaccount

# 集群信息
kubectl cluster-info
2.5.6.etcd集群
1
2
3
4
5
# 进入容器内部
kubectl exec -ti -n kube-system etcd-master01 sh
# 执行命令
export ETCDCTL_API = 3
etcdctl --endpoints = https://[127.0.0.1]:2379 --cacert = /etc/kubernetes/pki/etcd/ca.crt --cert = /etc/kubernetes/pki/etcd/healthcheck-client.crt --key = /etc/kubernetes/pki/etcd/healthcheck-client.key member list
1
2
client : etcd cluster is unavailable or misconfigured; error #0: malformed HTTP response " \x 15 \x 03 \x 01 \x 00 \x 02 \x 02"
; error #1: dial tcp 127.0.0.1:4001: getsockopt: connection refused
1
2
3
4
# 修改环境变量
export ETCDCTL_ENDPOINT = https://127.0.0.1:2379
# 查看集群列表
etcdctl --endpoints = https://[127.0.0.1]:2379 --cacert = /etc/kubernetes/pki/etcd/ca.crt --cert = /etc/kubernetes/pki/etcd/healthcheck-client.crt --key = /etc/kubernetes/pki/etcd/healthcheck-client.key member list
1
2
3
3cbf32015864aa27, started, master02, https : //192.168.3.12:2380, https://192.168.3.12:2379
71f26872cb1756fc, started, master01, https : //192.168.3.11:2380, https://192.168.3.11:2379
da9bb37422ca7d8d, started, master03, https : //192.168.3.13:2380, https://192.168.3.13:2379
2.5.7.node节点安装
node节点需要安装kubeadm、kubelet组件,kubectl可以不安装
1
yum install -y kubelet-1.13.0 kubeadm-1.13.0 --disableexcludes = kubernetes
1
systemctl enable kubelet
确保kubelet 的cgroup drive 和docker的cgroup drive一样:
1
sed -i "s/cgroup-driver=systemd/cgroup-driver=cgroupfs/g" /usr/lib/systemd/system/kubelet.service.d/10-kubeadm.conf
1
2
3
cat >> /etc/hosts << EOF
192.168.3.10 cluster.kube.com
EOF
1
kubeadm join cluster.kube.com:16443 --token 5kad4d.1pa4jvjcba4tttsl --discovery-token-ca-cert-hash sha256:f1551456908535ed0c6078a199651a01ddf5cfb470a901f3e24701ea996f978e
忘记加入集群命令时,可使用如下方式重新获取
1
2
3
4
5
6
# 简单方法
kubeadm token create --print-join-command
# 第二种方法
token = $( kubeadm token generate)
kubeadm token create $token --print-join-command --ttl = 0
2.5.8.安装dashboard
在node节点上安装,节点上需要有相关镜像。
2.5.8.1.安装
1
wget https://raw.githubusercontent.com/kubernetes/dashboard/master/aio/deploy/recommended/kubernetes-dashboard.yaml
修改配置文件(主要是设置端口类型为 NodePort)
1
2
3
4
5
6
7
8
9
10
11
12
13
14
15
16
17
# ------------------- Dashboard Service ------------------- #
kind : Service
apiVersion : v1
metadata :
labels :
k8s-app : kubernetes-dashboard
name : kubernetes-dashboard
namespace : kube-system
spec :
type : NodePort
ports :
- port : 443
targetPort : 8443
nodePort : 30001
selector :
k8s-app : kubernetes-dashboard
1
kubectl create -f kubernetes-dashboard.yaml
1
kubectl get service -n kube-system -o wide
2.5.8.2.创建用户
创建dashboard-rbac.yaml文件,内容如下:
1
2
3
4
5
6
7
8
9
10
11
12
13
14
15
16
17
18
19
20
apiVersion : v1
kind : ServiceAccount
metadata :
labels :
k8s-app : kubernetes-dashboard
name : admin
namespace : kube-system
---
apiVersion : rbac.authorization.k8s.io/v1
kind : ClusterRoleBinding
metadata :
name : admin
roleRef :
apiGroup : rbac.authorization.k8s.io
kind : ClusterRole
name : cluster-admin
subjects :
- kind : ServiceAccount
name : admin
namespace : kube-system
1
kubectl create -f dashboard-rbac.yaml
1
kubectl describe secret admin -n kube-system
2.5.8.3.登录页面
打开连接(火狐 ): https://192.168.3.11:30001
选择令牌 登录方式
输入上图中的token,点击登录
2.5.8.4.创建证书
1.创建自签名CA
1
openssl genrsa -out ca.key 2048
1
openssl req -new -x509 -key ca.key -out ca.crt -days 3650 -subj "/C=CN/ST=HB/L=WH/O=DM/OU=YPT/CN=CA"
1
openssl x509 -in ca.crt -noout -text
2.签发Dashboard证书
1
openssl genrsa -out dashboard.key 2048
1
openssl req -new -sha256 -key dashboard.key -out dashboard.csr -subj "/C=CN/ST=HB/L=WH/O=DM/OU=YPT/CN=192.168.3.11"
1
2
3
4
5
6
7
8
9
cat >> /root/kubernetes/certs/dashboard.cnf << EOF
extensions = san
[san]
keyUsage = digitalSignature
extendedKeyUsage = clientAuth,serverAuth
subjectKeyIdentifier = hash
authorityKeyIdentifier = keyid,issuer
subjectAltName = IP:192.168.3.11,IP:127.0.0.1,DNS:192.168.3.11,DNS:localhost
EOF
1
openssl x509 -req -sha256 -days 3650 -in dashboard.csr -out dashboard.crt -CA ca.crt -CAkey ca.key -CAcreateserial -extfile dashboard.cnf
1
openssl x509 -in dashboard.crt -noout -text
3.重新部署dashboard
1
kubectl delete -f kubernetes-dashboard.yaml
创建 secret “kubernetes-dashboard-certs”
1
kubectl create secret generic kubernetes-dashboard-certs --from-file = /root/kubernetes/certs -n kube-system
1
kubectl get secret kubernetes-dashboard-certs -n kube-system -o yaml
1
kubectl apply -f kubernetes-dashboard.yaml
4.浏览器导入证书
将生成的自签名证书ca.crt 文件,导入浏览器。
访问页面: https://192.168.3.11:30001


